
I wrote an article with a basic explanation of what is Docker. Being able to talk about Docker with a little bit of confidence is great; but, how do I use it? In this article, I will show you how to use Docker by example. You’ll learn how to install WordPress with Docker with little effort. Reading this tutorial will help you be more confident and knowing how to get a docker image running from scratch.
Docker Installation
Local installation is easy as pie! You just need to go to https://docs.docker.com/get-docker/ and get the right installer for your Operating System. That website has more specific instructions there in case needed, so I won’t spend a lot of time on this.
I need to warn you, the containers you can run out of the box depend on your Operating System. Running a Linux container on a Windows machine needs some extra tweaking. For simplicity, I highly recommend you always use a Mac or a Linux machine to work on software development. Yes, Windows is also a possibility, but you are better off installing WSL on your machine if that’s the case.
The Docker Community
There is a community online where people share containers for public or private use, Docker Hub. Docker Hub is a “registry” where you have access to a big number of container images. The good thing about this “hub”, is that big companies publish images of ready-to-use software; and they do a good job with its documentation. Of course, individuals can also upload and share with the community. For this article, I won’t show you how to push your project into Docker Hub; but we will use it to get WordPress and MySQL up and running.
Now, a word of warning that is very important for you to know. It is extremely important for you to be careful of which containers to consume from the Hub. In the end, you are running code that someone else packaged and you don’t always know what is on it. It has happened in the past, that individuals have included crypto mining applications running in the background without consumers knowing. But honestly, this shouldn’t stop you from running containers built by others; just be careful the source looks legit.
Running MySQL
I was going to title this section “Installing MySQL”, but I remembered we are NOT installing anything. We are just taking a container and running it with the configurations we choose.
Let’s go to Docker Hub to read take a look at the configuration for MySQL Docker Official Image. They have an example of the command you would need to run to start a docker container:
docker run --name some-mysql -e MYSQL_ROOT_PASSWORD=my-secret-pw -d mysql:tagYou can give that a try if you want; but, since we want to install MySQL with a few tweaks here and there; we need to make a few adjustments. And to be able for you to understand those adjustments, we need to first dissect what that command is doing.
Dissecting a Docker Run command
The –name option is the name we wish to give our docker container instance when it gets created.
The -e tag, also used as –env, is used to configure environment variables for the container to use. Usually, these environment variables are the way we do configurations on top of the standard installation of the application. In this case, the root password is being defined when the container is initialized.
Finally, the -d option, also known as –detach, is used to run a container in the background. This way you won’t have to keep the terminal window open while the container is running. If you wish, you could remove this option and see the logging output it is giving while running.
Additional options and explanations can be seen by using the –help option on docker run, like this:
docker run --helpAlso, at the end of the command, you can see it has mysql:tag. This tag is used to specify the image and tag to be downloaded from the hub. Think of tags as versions of the container package.
Starting Our MySQL server
Now that we know what those options mean; we can configure our container for our needs. We need a MySQL server, but we also need a username to log in that has access to a database. It’s possible to run a container without it and add it later on, but I want to avoid that complexity for now. On the documentation, it is specified that a default user and database can be initialized by using the following environment variables: MYSQL_DATABASE, MYSQL_USER, and MYSQL_PASSWORD.
We also want to change our container name to something more specific and use a specific image tag. Also, containers, by default, won’t open up ports automatically. For container ports to be accessible to the open world, in this case your local machine, we need to call them out. For this, we will expose port 3306, which is the standard port for MySQL.
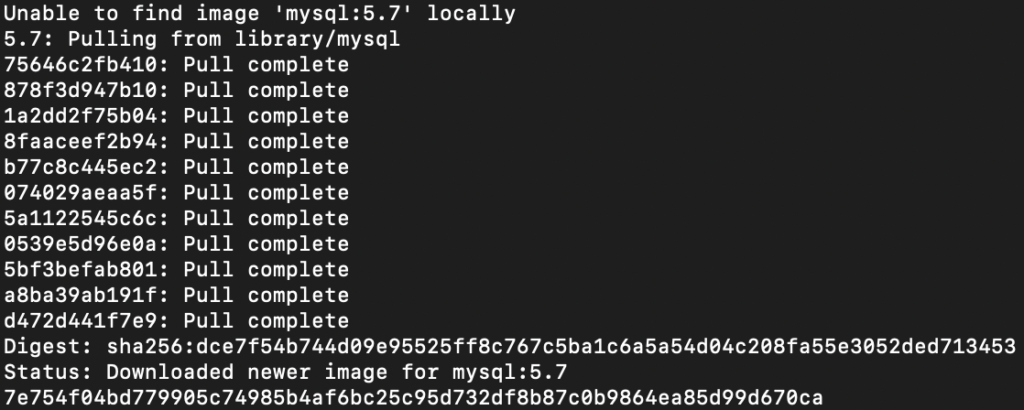
docker run --name wordpress-database -e MYSQL_RANDOM_ROOT_PASSWORD=yes -e MYSQL_USER=wordpress -e MYSQL_PASSWORD=p455w0rd -e MYSQL_DATABASE=wordpressdb -p 3306:3306 -d mysql:5.7In the end, you will see something like the following, which means everything went well.
If you want to check the status of your container along with additional information you can run the following command:
docker ps -f name=wordpress-databaseCongratulations! You’ve got your first container running locally.
Running WordPress
So, we’ve got a MySQL server running with an open port on 3306. The next step needed is to run our WordPress server connected to that database.
Installing WordPress would usually be a daunting task which would involve installing an HTTP server along with PHP. This installation could easily take a few hours to get it right. Thankfully, there is an official WordPress container image available for use!
Now that you know how to go through documentation and dissect the run command; I will be skipping all of that. Instead, let’s think of what we need. WordPress needs to connect to the database host. We need to expose port 80 for HTTP connections. And finally, we need to allow WordPress to connect to our database server, so we will use the –link option. Also notice that as the host variable for the WordPress database I’m using the same name we used for our database.
In the end, the command will look like this:
docker run --name my-blog -e WORDPRESS_DB_HOST=wordpress-database -e WORDPRESS_DB_USER=wordpress -e WORDPRESS_DB_PASSWORD=p455w0rd -e WORDPRESS_DB_NAME=wordpressdb --link wordpress-database -p 80:80 -d wordpress:5.7And that’s it! In two command lines and in less than a minute you have successfully set up a WordPress server locally. You can now go to http://localhost to see it in action.
Clean Up
Now that we have the server running; we need to talk about how to stop it, start it, or remove it when it isn’t needed.
So first, we need to identify our Container ID for the container we want to stop. Just run this command to get a list of active containers:
docker psThe terminal will show some output of the Container ID for all running images. Now, to stop it you would do something like:
docker stop <containerId>At this point, your container isn’t completely dead but stopped, similarly you can start it like this:
docker start <containerId>If you wish to completely remove your container completely then run the following command after stopping the container.
docker rm <containerId>So, that’s it? Deploy to Prod?
The short answer is no. What we did in this article was great progress. We learned how to start a WordPress and connect it to a MySQL server with just a couple of commands. But there are still more things that need to be taken care of to call it “production-ready”.
For instance, data in the container we ran on this article is ephemeral. Meaning data on the container will be erased when it stops running. To fix it, mount volumes on the container. With a volume, the data would be stored in a permanent directory on our machine. This way you won’t lose your hard work when the container gets restarted.
Security-wise, this isn’t secure at all. We exposed port 3306 on our database, which means we exposed it to the whole world; our local machine in this case. If there was an exploit or anything, an attacker could easily have access to our database. A better approach would be to run the database behind a firewall, where only WordPress would be accessible. This way we can protect the database and only expose what users need to have access to and nothing else.
And lastly, this is not scalable at all. So far you can have a container running on one server, but it might be better to have multiple servers with the front end connecting to the database server. That way you can load balance requests going to your front end. Furthermore, you could also have a database cluster where your WordPress connects to; so the database could also be load-balance and also have high availability in case of a container is down.
I guess, what I’m trying to say is, don’t expect to go to production with this tutorial. Don’t be discouraged. This is great progress, but there is way more to it. You are in the right direction and I will soon write a couple more articles soon to help you fill those gaps. For now, go play around starting servers and configuring them on your own. It is the best way to learn!
Leave a Reply